
How to make paratha aloo stuffed is mostly about two things: getting a smooth, elastic dough, and keeping the potato filling dry enough to behave but moist enough to taste great. If your paratha keeps tearing, the filling leaks, or the bread turns stiff after cooling, you’re not alone—those are the most common pain points.
The good news is you don’t need special equipment, and you don’t need to be a pro. A few small choices—how you mash potatoes, how long you rest dough, and how you seal—change everything. I’ll walk you through a reliable method, plus quick fixes for the “why did this happen?” moments.
Key takeaway: soft dough + well-seasoned, low-moisture filling + gentle rolling = tender, flaky parathas that don’t burst.
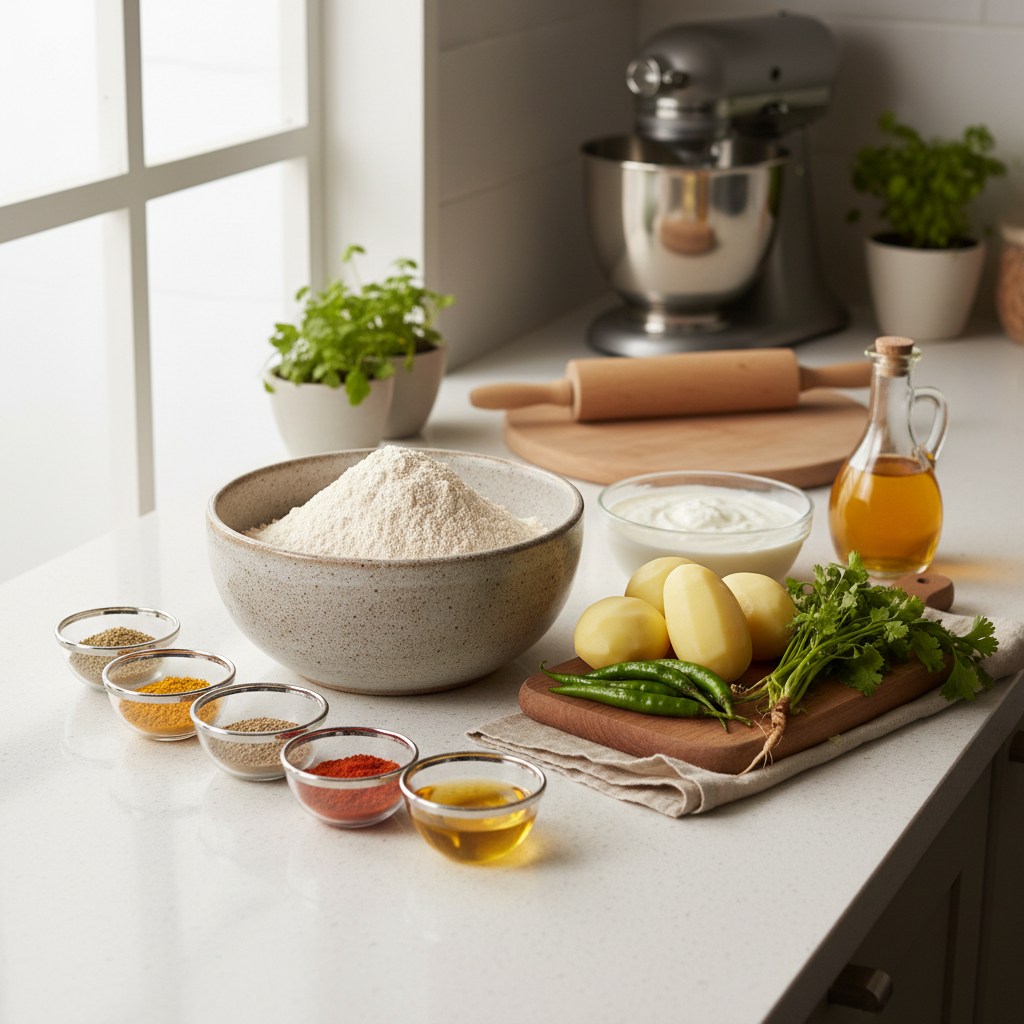
What you’ll need (ingredients + tools)
This recipe aims for 6 medium parathas, a comfortable batch for a couple meals.
Ingredients
- Whole wheat flour (atta): 2 cups, plus extra for dusting
- Salt: 1 tsp (split between dough and filling)
- Neutral oil or ghee: 2 tsp for dough, plus more for cooking
- Water: about 3/4 cup, added gradually
- Potatoes: 3 medium, boiled and cooled
- Green chili: 1–2, finely chopped (optional)
- Cilantro: 2–3 tbsp, chopped
- Ground spices (adjust to taste): cumin, coriander, chili powder, garam masala
- Optional boosters: grated ginger, ajwain (carom seeds), amchur (dry mango powder), kasuri methi
Tools
- Rolling pin + board
- Skillet or tawa (cast iron works well)
- Spatula, mixing bowls, clean towel
Why stuffed aloo paratha tears (real-world causes)
If you want fewer blowouts, it helps to know what causes them. Most failures come from one of these.
- Filling too wet: hot potatoes, watery add-ins, or overmixing makes the center sticky and prone to leaking.
- Dough too tight: under-hydrated dough resists stretching, so it rips when you try to roll.
- Uneven stuffing: big lumps or thin dough spots create weak points.
- Not enough rest time: gluten needs time to relax; skipping rest makes rolling harder.
- Heat too high too soon: the outside sets before inside cooks, encouraging cracks and dry texture.
According to the USDA, cooked potatoes should be cooled and stored safely to reduce food-safety risk; in home cooking that usually means letting them cool promptly and not leaving them out for long periods. If you’re meal-prepping, refrigerate and reheat properly.
Quick self-check: which situation are you in?
Before you restart the whole recipe, run this fast diagnosis. It saves time and frustration.
- Your dough cracks at the edges while rolling: it’s too dry, or it didn’t rest long enough.
- Filling squeezes out the sides: you overstuffed, or the seal is weak.
- Paratha turns stiff after cooling: dough is tight, heat was too high, or you underused fat while cooking.
- Brown spots but raw center: pan too hot, or paratha too thick.
- Greasy paratha: oil/ghee added too early or too much, while heat stayed low.
If more than two bullets match your problem, don’t “power through.” Make one adjustment at a time—especially dough hydration and filling dryness.
Step-by-step: how to make paratha aloo stuffed (the reliable method)
1) Make and rest the dough
Mix flour and 1/2 tsp salt, add 2 tsp oil or ghee, rub in briefly, then add water a little at a time. Knead until smooth, soft, and slightly tacky but not sticky. Cover and rest 20–30 minutes.
- Feel target: when you press a finger in, it should bounce back slowly.
- If it feels firm, add 1–2 tsp water and knead again.
2) Prep the aloo filling (keep it dry, keep it flavorful)
Boil potatoes, cool fully, then peel and mash. Add remaining salt, spices, chili, cilantro, and any optional boosters. Mix until uniform, then form 6 balls.
- Dryness trick: if potatoes seem wet, spread mash on a plate for 5–10 minutes before seasoning.
- Lump rule: tiny lumps are fine, big lumps create tears.
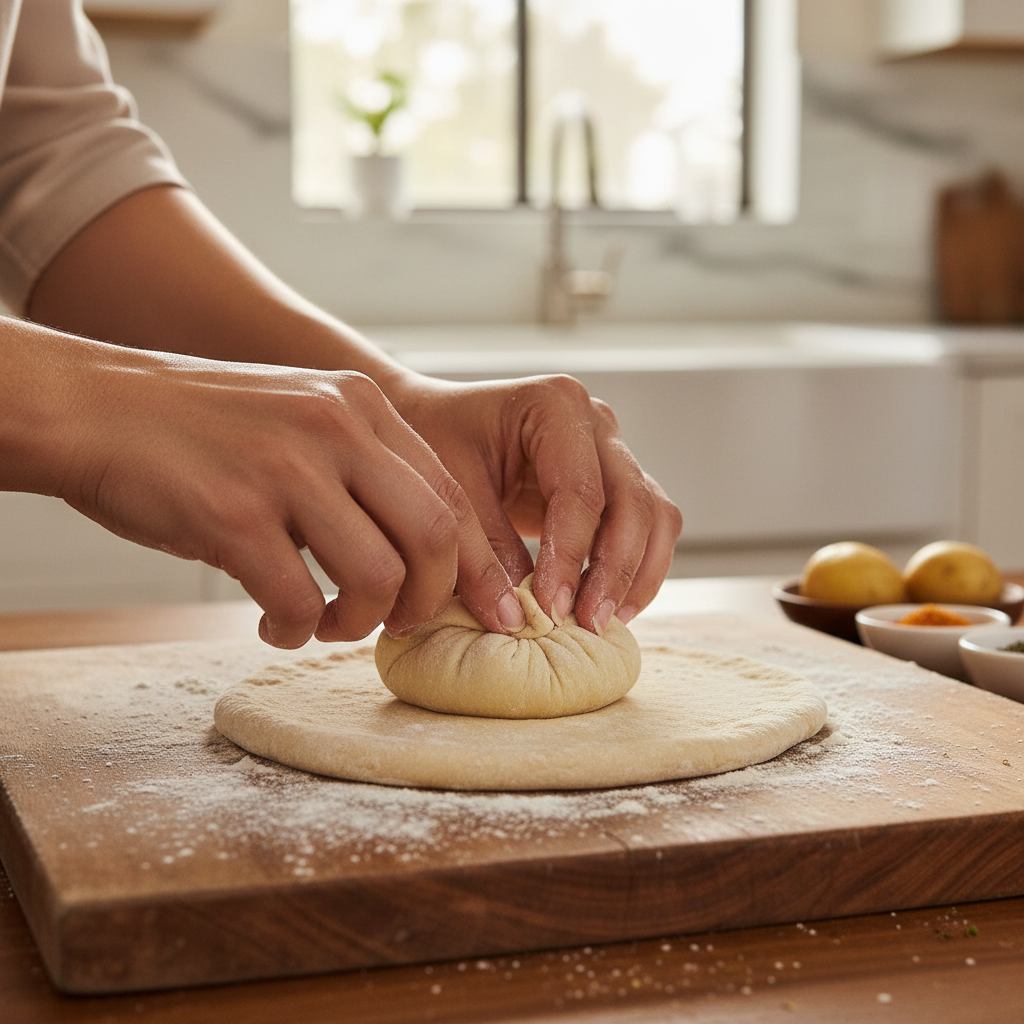
3) Stuff and seal (two beginner-friendly options)
Option A: Cup-and-pinching method works well when you want a secure seal. Roll a dough ball into a 4-inch circle, place filling in the center, lift edges like a pouch, pinch closed, then flatten gently.
Option B: Sandwich method reduces pressure on the seal. Roll two smaller circles, spread filling on one, cover with the second, press edges to seal, then roll lightly.
- Stuffing amount: aim for filling roughly equal to dough ball size, not double.
- Flour use: dust lightly; too much dry flour can make the surface tough.
4) Roll gently
Roll from the center outward, rotate often, and use light pressure. If a bubble forms, pause and dust lightly instead of pressing harder.
If you see a small tear, pinch it closed and dust, then roll around it rather than over it.
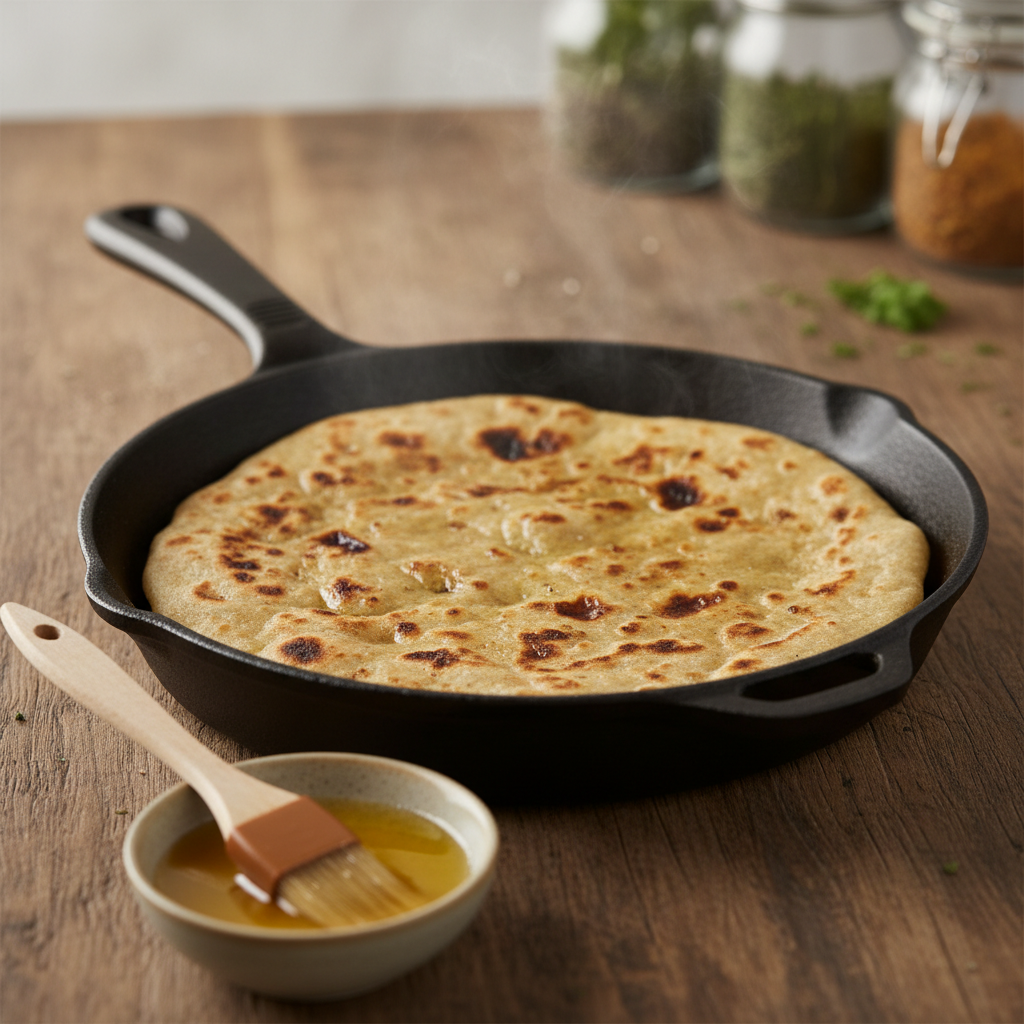
5) Cook on medium to medium-high heat
Heat a skillet. Cook one side 30–45 seconds until you see light bubbles, flip, cook 30–45 seconds, then brush oil or ghee and flip again. Press lightly around edges so steam escapes and layers cook evenly.
- Color goal: golden with scattered brown spots, not dark all over.
- Keep soft: stack in a towel-lined container to trap steam.
Timing and temperature cheat sheet (table)
This is a practical guide, not a strict rule—stoves vary a lot in U.S. kitchens.
| Stage | What you’re looking for | Typical time | Common fix if it’s off |
|---|---|---|---|
| Dough rest | Relaxed, easy to roll | 20–30 min | Rest 10 more min if springy |
| First side cook | Light bubbles, pale spots | 30–45 sec | Lower heat if browning too fast |
| Second side cook | More bubbles, structure sets | 30–45 sec | Increase heat slightly if still raw |
| Oil/ghee finishing | Even browning, soft bite | 30–60 sec total | Use less fat if greasy, raise heat a touch |
Key point: if you want flaky layers, you need enough heat to puff slightly, but not so much that the outside burns before the center warms through.
Practical variations for U.S. kitchens (and common substitutions)
You can still make excellent stuffed parathas with what’s easy to find at American grocery stores.
- Flour: if you can’t find atta, use whole wheat flour; texture may be a bit heartier. A small portion of all-purpose flour can soften it, though purists often skip it.
- Fat: ghee adds classic flavor; neutral oil works fine for everyday cooking.
- Spice level: start mild, then adjust. Many spice jars in the U.S. vary in strength by brand and freshness.
- Add-ins: grated cheddar or pepper jack is a common fusion move, but it increases leak risk if overfilled.
For serving, plain yogurt, pickle, or a simple salad balances the richness. If you watch sodium or fats, you can scale seasoning and ghee down, though texture might be slightly less tender.
Mistakes to avoid (so you don’t waste another batch)
- Stuffing hot potatoes: warm filling creates steam and weakens dough, then tears show up mid-roll.
- Over-flouring the board: extra flour dries the surface and makes parathas taste dusty.
- Pressing hard with the spatula: gentle pressure helps; smashing can force filling out.
- Skipping the towel stack: parathas dry fast in open air, especially in heated, low-humidity homes.
If you’re still learning how to make paratha aloo stuffed neatly, the “sandwich method” is often the easiest way to get consistent results without stress.
When to get extra help (or at least change approach)
If you have dietary restrictions (celiac disease, wheat allergy, very low-sodium diets), adapting stuffed parathas can get tricky because gluten structure matters for sealing and rolling. In those cases, it may be worth consulting a registered dietitian for ingredient swaps that fit your needs.
Also, if you’re batch-cooking for kids, elderly family, or anyone with higher food-safety risk, keep an eye on cooling and storage time for cooked potatoes and cooked flatbreads. When in doubt, follow conservative storage practices and reheat thoroughly.
Conclusion: your next batch can be better, fast
Once you lock in a soft rested dough and a drier, well-seasoned potato filling, stuffed parathas stop feeling fragile and start feeling forgiving. Make one small change per batch, take notes on dough feel and pan heat, and you’ll get that soft-chewy center with crisp golden spots more consistently.
Try this next: rest your dough 30 minutes, cool potatoes fully, then roll with a lighter hand. If you want an even simpler learning curve, use the sandwich method for your first few rounds.